Saturday, September 1, 2018
Daniel's Wedding!
Hello fellow crafters - I know, long time no Sue! I seriously don't know where the time goes, I know as I get older the time flies more quickly! Fancy that! Before I publish this article I have to tell you that I seem to have lost my background on my blog, I only just noticed it when I previewed this post. I don't quite know what happened, but I'm going to look into it. So, for now, please forgive the look of my blog and give a look at the Wedding Wallet I have made for my (adopted, handpicked, culled!!) grandson Daniel! When we moved here to PA, Daniel was 5 and my grandson Bryan was 3, they immediately became friends and grew up as brothers. Daniel had no grandparents in his family as they had all passed away, hence, me, Nanny! Well on 8/18/2018 Daniel married the love of his life, Miranda! The wedding was held at Brandywine Manor in Honey Brook, PA. What a gorgeous setting it was, a truly beautiful wedding!
Here is the Wedding Wallet, I got the inspiration from Heather Robinson, she doesn't have a blog as far as I know, but she is on Facebook. I used three stamp sets: Beautiful Bouquet and Dandelion Wishes for the sentiments and Floral Phrases for the stamp in the middle of the belly band. The paper I used was whisper white and the DSP (retired unfortunately) is silver and rose gold embossed paper - gorgeous! For the decorations on the belly band I used the Everyday Jars and Natures Roots Framelits. The belly band is copper foil and whisper white. The corner embellishment on the inside panel is actually a three-way punch! Yes, it has this little leaf, a corner rounder and a small oval to thread ribbon or twine through - so handy I might add!
Well, that's it for me today, I hope you like my money wallet, it's not only for weddings, you can make one for any occasion where you want to give a monetary gift. Personally, I think it's way better than you can find in a Hallmark store! In my very humble opinion! I would love to have you as my customer, a link to my store and email are at the top of this post. Please don't hesitate to reach out if you have any questions at all. I would also love to have your feedback, I always read all of them! So, til next time enjoy the rest of this Labor Day weekend, I hope you are having good weather where you are - fall is coming y'all!
Saturday, April 14, 2018
Dragonfly Dreams FMS 332
Good Saturday afternoon!
I had such fun last week entering the Freshly Made Sketches challenge that I really wanted to try again this week! This card I made for my friend who lives in California whom I don't get to see very often. It's truly a hike from my home in Stroudsburg, PA! I love to send her "Happy Mail' now and again, she is truly "happy" when she receives it! I was reminded of her today as the temperature is currently 81°, so I'm pretty sure she is experiencing the same kind of weather! So here is the Freshly Made Sketch for this week:
and here is my card:
The card base is Very Vanilla, the first mat is Bermuda Bay followed by a Very Vanilla mat. I used the stamp set Dragonfly Dreams and the accompanying thinlets. The large dragonfly was stamped using Bermuda Bay and the detailed thinlet was cut from Dazzling Diamonds glitter paper.The DSP is called Falling in Love and sadly is retired from SU, but it just seemed to fit so perfectly with the dragonfly I thought. In the top right I stamped the bubble stamp from You're Inspiring, I've used that on a lot of my cards lately, I just think it adds that little 'something'! I then placed two of the small dragonflies, which were also die cut from Dazzling Diamonds glitter paper on top. To finish it off I placed three clear epoxy shapes towards the top of the card, but I'm not sure they're showing up too well.
To see all of the wonderful designs linked to this challenge please go to Freshly Made Sketches here. I am always in awe of the gorgeous designs and inspiration each week from this challenge and I'm sure you will be too!
So, enjoy the rest of your weekend and all the products I used for this card (besides the DSP) can be purchased from my online store. If you don't have a demonstrator, I would love to be yours! If you have any questions at all, please don't hesitate to contact me, my email and online store are on my blog Forget-me-not-Treasures!
Thursday, April 12, 2018
Wedding Anniversary
Hello Bloggers!
Today I have a Wedding Anniversary card for my good friends in Minnesota, Julie and Tom! Unfortunately I don't know how many years, I can't ask cause then she'll know why I'm asking! I've known them for many years, she is a Hardanger embroidery designer that I met at a Needlework convention in New Hampshire and we made an instant connection. If any of you have attempted hardanger, then you'll know it's not easy! She has a fantastic DVD called "Taking the 'hard' out of Hardanger", so if you are a stitcher and have a difficult time with hardanger, get this DVD, it's the best! This is Julie's site, just click here
On to my card! Because it's spring (at long last!), I decided to use the 'You're Inspiring' stamp set that was in the Occasions Catalog, which I'm very happy to report is carrying over to the new 2018-2019 Annual Catalog! I've made so many cards with this set, I absolutely love Daffodils, they remind me of my Mum! Just to see them popping their beautiful trumpeted heads from the cold crusty earth brings joy to my heart! Here is my card:
Today I have a Wedding Anniversary card for my good friends in Minnesota, Julie and Tom! Unfortunately I don't know how many years, I can't ask cause then she'll know why I'm asking! I've known them for many years, she is a Hardanger embroidery designer that I met at a Needlework convention in New Hampshire and we made an instant connection. If any of you have attempted hardanger, then you'll know it's not easy! She has a fantastic DVD called "Taking the 'hard' out of Hardanger", so if you are a stitcher and have a difficult time with hardanger, get this DVD, it's the best! This is Julie's site, just click here
On to my card! Because it's spring (at long last!), I decided to use the 'You're Inspiring' stamp set that was in the Occasions Catalog, which I'm very happy to report is carrying over to the new 2018-2019 Annual Catalog! I've made so many cards with this set, I absolutely love Daffodils, they remind me of my Mum! Just to see them popping their beautiful trumpeted heads from the cold crusty earth brings joy to my heart! Here is my card:
I used Whisper White for my card base with a tangerine tango mat. On top of that mat I used a piece of the Color Theory DSP and stamped it with the little bubble stamp from the set. I stamped the daffodils using Momento black ink onto a whisper white piece that I had die cut using the large oval from the Stitched Shaped dies. I also stamped the actual blooms again, colored them and fussy cut them. Using dimensionals I placed them on top of the blooms on the oval cutout. Of course I had to add some Wink of Stella to them to give them that 'early in the morning' dewy look! Before placing the oval onto the card base, I placed a doily to go underneath. I finished off by placing 3 glitter enamel dots around the flowers and a piece of organza ribbon tied into a bow. Unfortunately the glitter enamel dots are retiring, I love them so have ordered two more packs!
I really enjoyed making this card for my friends, I hope they like it and I hope you do too! If you don't have a Demonstrator, I would love to be yours! If you would like to purchase any of the products I have used, please use the link at the top right of my blog, it will take you directly to my store! Similarly, if you have any questions, I would love to help you, my gmail is also at the top right of my blog. See you next time, happy crafting!
Saturday, April 7, 2018
Happy Panda!
Hi there!
Today I have a card for my grandson's 11th birthday coming up next week. I'm also entering it into this weeks Freshly Made Sketches. I love seeing what everyone comes up with each week for this challenge. Here is the sketch:
When I saw this weeks sketch I immediately saw two pieces of bamboo and a Panda and thought 'wow, and I didn't even have to think about it!'
Of course, my grandson, Jaden, loves Pandas - well any animal for that matter! Plus the two pieces of bamboo look like the number '11', which will be his age on the 13th! I know, that's stretching it, but what the hoo! Without further ado, here is my card:
Today I have a card for my grandson's 11th birthday coming up next week. I'm also entering it into this weeks Freshly Made Sketches. I love seeing what everyone comes up with each week for this challenge. Here is the sketch:
When I saw this weeks sketch I immediately saw two pieces of bamboo and a Panda and thought 'wow, and I didn't even have to think about it!'
Of course, my grandson, Jaden, loves Pandas - well any animal for that matter! Plus the two pieces of bamboo look like the number '11', which will be his age on the 13th! I know, that's stretching it, but what the hoo! Without further ado, here is my card:
The bamboo I cut out using my Cricut as I didn't have a bamboo stamp! I water-colored the background using Pool Party, Soft Sky, Pear Pizzazz and Crumb Cake although the picture isn't too definitive in the colors, but that's the best picture I could get it! The Panda is from Party Panda which was a free set during Sale-a-Bration -he's so cute, but unfortunately this set is no longer available. I put the one piece of bamboo and the Panda on dimensionals to give a little depth to the card and finished off by using two light blue and one light green Glitter Enamel Dots and, of course, some Wink of Stella!
I hope you like my card, I had such fun creating it. Please go over to Freshly Made Sketches and check out all the awesome cards that everyone have submitted -you won't be disappointed!
Saturday, March 31, 2018
Mother's Day Wreath
Hello and Happy Easter to all in blog land!
Today I have a Mother's Day card for my grandchildren to give to their Mom! My friend, Dottie, had seen a card on Pinterest that used one of the Swirly Scribble thinlets to create a wreath. The card was beautiful and I wanted to make one but unfortunately I don't have that thinlet set, so I created my own using my Cricut Explore!
The card base is Pink Pirouette and I decorated it with flowers and leaves from the Seasonal Layers and Botanical Garden thinlets. Unfortunately the latter set of thinlets is now retired I'm very sorry to say - what a fantastic set it is! I wanted to add a little something something to the petals, so I drew lines on them mimicking the veins of the flowers. I also added various size pearls, according to the size of the flower, with a couple on the card base itself. I finished off the wreath with a double bow using Linen thread. The DSP is a piece from the Springtime Foils DSP which was free from the Sale-a-Bration catalog. I think this is the most stunning DSP that SU has ever had and they've had some gorgeous DSP in my time!
Well I hope you like my card, oh, and I hope my daughter does too! Tomorrow is Easter Sunday and I hope you have a wonderful time. Wishing you all the blessings that come with this sacred day, from my family to yours!
Thursday, March 22, 2018
Lots of Lavender Sale-a-Bration
Hi Folks!
It's me again with another card! This time I'm using the 'Lots of Lavender' Sale-a-Bration freebie! I love this stamp set, I can't seem to stop finding a reason to use it and it's free, what more I ask! I seem to be always making a card for someone, or something - not usually just because! This time my son Russell, who lives in Santa Clara, California asked me, back in January, if I would make another Mother's Day card for him (actually for Theo, my grandson). I made one last year that apparently went down well and he gave me oodles of time so here we are! Julie, my daughter-in-law loves any shade of the color purple, so what better stamp than Lots of Lavender! I CASED a card by a Stampin Up demonstrator, link here: Melissa from Melissa's Kre8tions. I changed just a couple of things to put my own 'touch', on it! Firstly I embossed the white mat with the Pinewood Planks embossing folder - love this EF, it's one of SU's dynamic folders. These type of embossing folders create deep, dimensional embossed impressions which turn out really cool! After I had diecut the stitched shape frame, I embossed it with the Layered Leaves EF, also one of the dynamic embossing folders. To add a little bit of interest, and to add a little more purple, I sponged just the corner of the frame with Perfect Plum ink. For the ribbon, I used lace trim - when I think of Lavender I think of lace! Makes me think of my own Mum, she loved Lavender too! After stamping the Lavender in Momento black ink I used my Stampin Blends to color the image and then used Wink of Stella on the petals. The lattice at the bottom is a thinlet from the Petals and More thinlet dies. I think this adds a little interest to the sentiment. To finish it off, I put it on a card base of Elegant Eggplant, if I remember correctly, Melissa's card was done in Rich Razzleberry, another favorite of mine! Added a couple or three purple glitter dots and Bob's your Uncle, done!
Well, that's it for me today, as always, if you would like to purchase any of the items I have used, my website is at the top right of this post, I would love to have you as my customer. If you have any questions, my email is also at the top right, don't hesitate to reach out. Also, please feel free to comment on this post, I do so appreciate your feedback. Til next time....happy stamping!
Sunday, March 11, 2018
Wreath using my Misti!
Hello!
Long time no blog eh! I don't know what happened - yes I do, Halloween, Thanksgiving, Christmas - commonly referred to as "the Holidays"! Then in the latter part of January I took a spill and cracked my tailbone and am now still recovering - phew what an ordeal that was! So, onward and upward (we can only hope!) and back to my favorite pastime - paper-crafting! March 9th was my grandson, Bryan and his girlfriend's 6th Anniversary - yes, they have been a couple for 6 years, God Bless them! They are definitely soul mates and as soon as they have both completed college I'm sure that I will be hearing wedding bells! In the meantime I, of course, had to make them a card! Recently I was watching Sacha van der Kerkof who is a Stampin Up Demonstrator from the Netherlands. She was demonstrating how to use a template with the Misti to create a Wreath! She does give all the directions on how to create the template using your Stampin Trimmer - 129722 and a piece of Acetate, although you could probably use cardstock equally as well. Anyway, I came up with another idea, and I used my Cricut Explore! It was easy, I just used square shapes and the slice feature! It's a 5 x 5 square card and I used Colorful Seasons Stamp Set - 143726 (still a fave of mine!) for the flowers and Jar of Love - 141587 for the hearts and leaves.
I love making wreaths and I thoroughly enjoyed designing and making this card for my two lovebirds! I hope you like it too! As always, if you would like to purchase any of the items I have used, I would love to have you as my customer. My Stampin Up website is at the top right of this post. Similarly, if you have any questions, please don't hesitate to reach out to me by email, my email address is at the top right also, or feel free to comment on this post. I really appreciate all of your comments. So, til next time.....
Sunday, September 17, 2017
Autumn Chrysanthemum
Hello again! I'm thinking I'm on a roll at the moment! Three times in less than a week! The card I have for you today is using a new stamp set in the Holiday catalog that came out Sept 1st. It's called Painted Harvest, it actually has a whole suite, but I just got the stamp set and the Designer Series Paper (DSP). My Mum and Nan used to love to garden and we always had some kind of flowers throughout the year beginning with Snowdrops in January and continuing on to the beautiful Chrysanthemums in the fall. Consequently, I was dying to try my hand in trying to duplicate a chrysanthemum with this set. It's a two-step stamp, and after trying out several inks, I decided to use Crushed Curry and Cajun Craze for the flower and Pear Pizzaz and Old Olive for the leaves. For the center of the flower I used Soft Suede and Crushed Curry for the little dots, so cute! The flowers also were brushed with Wink of Stella, but I'm not sure that you can see it in the picture. The set also has this darling little acorn, I couldn't resist stamping a couple of those too! These were stamped using Crumb Cake and Soft Suede. I used Very Vanilla for my stamping mat, then mounted this, using dimensionals, onto a mat of gold glimmer paper. My card base is Cajun Craze. This is one of the many reasons I love Stampin Up, everything matches, you don't spend valuable time trying to match inks with paper etc. and the finished product looks so good! I was very pleased with the outcome of the 'Chrysanthemums', it brought me back to my childhood, I could almost smell them, that beautiful autumn, deep woodsy smell they have! I hope you like my card as much as I do and if you would like to purchase any of the items I have used, I would love to have you as my customer. My Stampin Up website is at the top right of this post. Similarly, if you have any questions, please don't hesitate to shoot me an email, address at top right also, or feel free to comment on this post. Til next time.......
Wednesday, September 13, 2017
Colorful Seasons.........again!
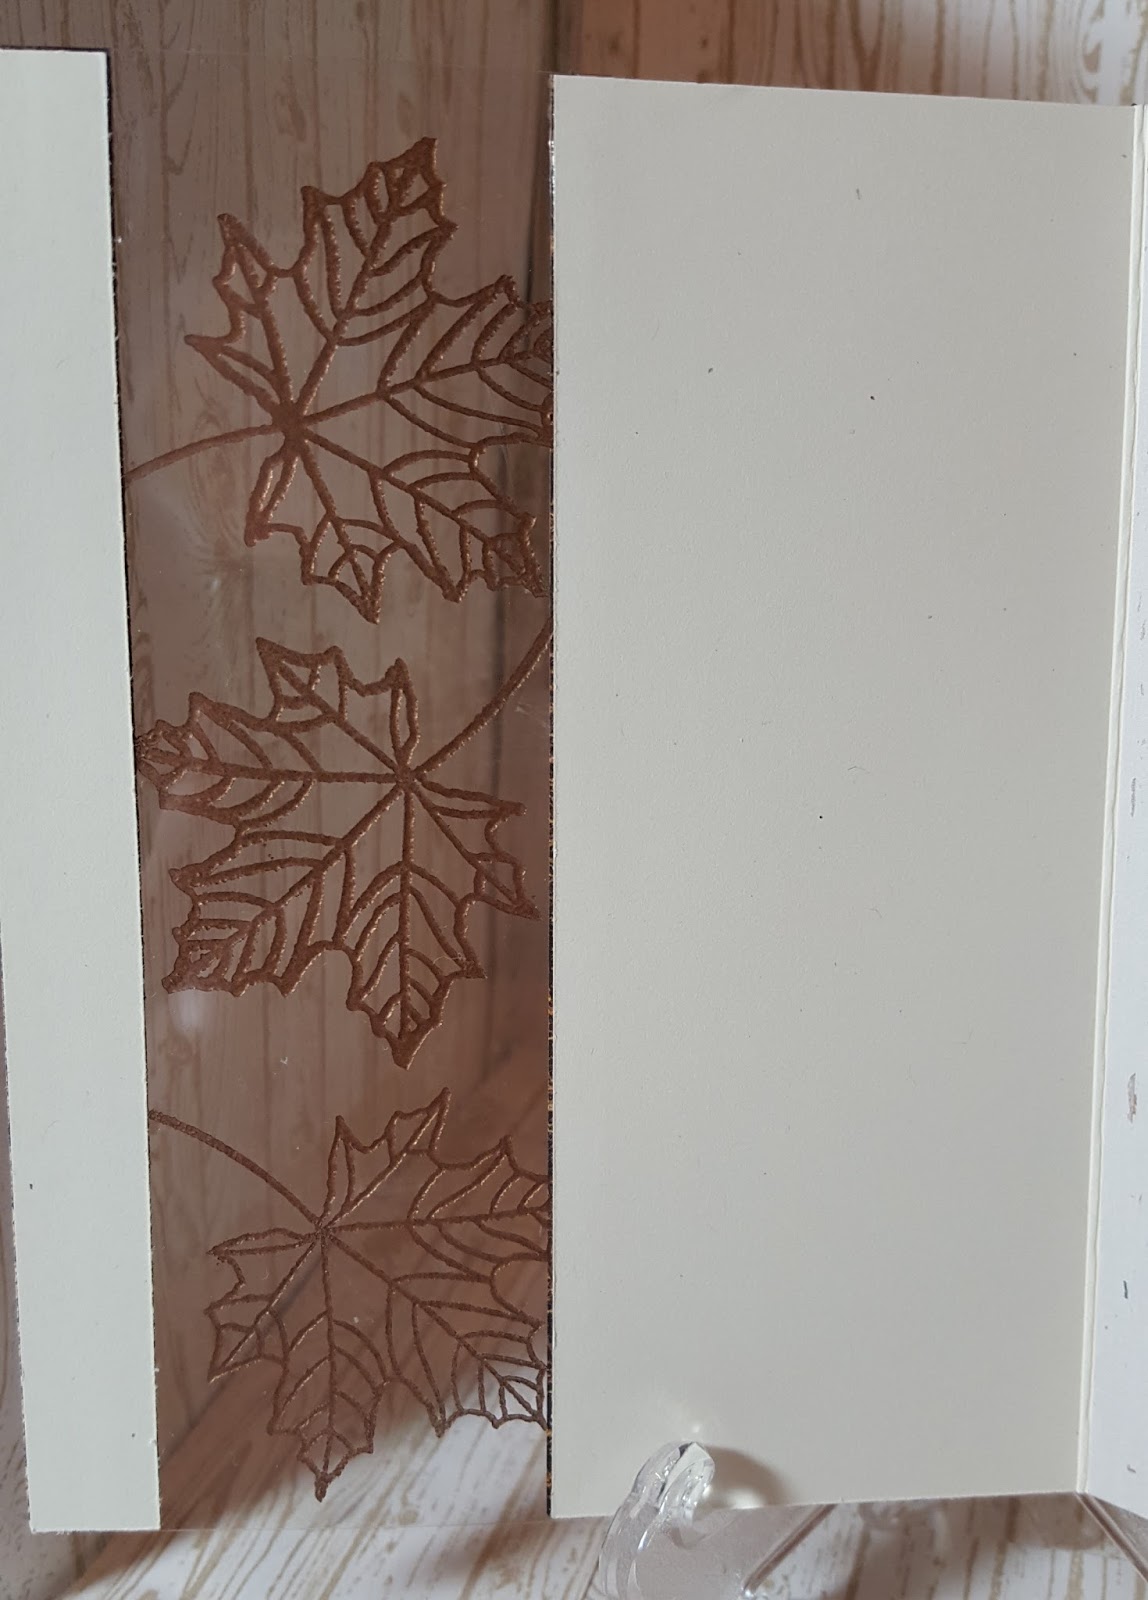
Here I am again! Didn't quite make my promise of 'the next day', but at least it wasn't two months! LOL! So these two cards I made using the Colorful Seasons stamp set again and the accompanying Seasonal Layers Thinlets. A while ago I saw a fellow Demonstrator (unfortunately, I don't remember her name) demonstrating a card with an acetate window in the front. So I decided I'd give it a try, I experimented on two cards before these two just to give myself a little practice. I decided as an extra step I would emboss on the acetate! Now I'll warn you, if you want to emboss on acetate you will have to get 'Heat Resistant Acetate', I got mine on Amazon. I sandwiched the acetate between the card base (thick very vanilla) and the DSP. The first card I used the Wood Textures DSP, the mat on the inside as well as the outside mats. The leaves on the acetate are embossed using the copper embossing powder and the finely detailed leaf stamp. Gorgeous, I love it! On the left hand front mat I cut out a copper leaf using the finely detailed leaf thinlet, it's so beautiful, I just want to keep cutting them out and using them on something.....anything! I cut two of the smaller leaves using gold shimmer paper and placed them above and below the center leaf. On the inside mat I stamped the branches and small leaf from the stamp set. A couple of days ago I was experimenting, using watercolor paper and various inks to make a mat I could use to cut out anything 'Autumny'! I was quite pleased with the result, hence the two leaves placed on the branch on the inside mat. So, this is the first card, the front and the inside left and right.
![]() |
| Front |
![]() |
| left inside front |
![]() |
| right inside front |
Now the next card is my absolute favorite, I felt with my first card, the copper embossing wasn't shown off enough as the DSP was kinda 'busy'! So this card, I embossed using gold embossing powder on the acetate and the left front of the card! On the inside I sponged the width of the acetate with Crushed Curry and Peekaboo Peach and then stamped the branches and leaves from the Colorful Seasons stamps. The card base is, again, thick Very Vanilla. To finish it off I used some of the glitter enamel dots in Crushed Curry.
![]() |
| Front |
![]() |
| Inside |
That's it for me today, as always, if you would like to purchase any of the items I have used or if you have any questions at all, I would be more than happy to help you. The links to my Stampin' Up store and my email are at the top right of this post! You can also leave me a comment, I love to read them, they give me a ton of encouragement to continue doing what I love to do! Thank you all so much, I hope you like these two cards.
Monday, September 11, 2017
Colorful Seasons - Autumn!
It's been a while since I last blogged! As much as I try and blog more often, life happens and my blog doesn't! LOL! I will attempt to blog at least once a week if possible, that doesn't seem to daunting!
Lately, I have been totally obsessed with the Colorful Seasons stamp set. This set was in the annual catalog that came out on June 1st. I made quite a few cards during the summer with the flowers and now that Autumn is here, I have been using the leaves. I love the colors of fall - the reds, the yellows and different shades of each, I love to sponge and create different combinations for the leaves. My first two cards I tried the 'baby-wipe' technique. Using my re-inkers, I put two drops each of Tranquil Tide, Pumpkin Pie, Crushed Curry, Lemon Lime Twist and Rich Razzleberry on to the baby-wipe. Then you can use this like an ink pad, putting your stamp into various parts to get the different hues to come through. I layered it onto a mat of Lemon Lime Twist, wrapped some 1/4" copper trim around the bottom and glued it to a Tranquil Tide card base. I wasn't really bowled over by this one, I thought it was a little too 'busy', I've never seen leaves with that many hues, but it was a good experience. I went back to the drawing board, so to speak, and this time I used three colors only, Crushed Curry, Cajun Craze and Rich Razzleberry. I stamped the leaves onto a piece of Color Theory DSP in Crushed Curry. It has a marbled effect and it's my favorite in the pack! I matted it onto a piece of Crushed Curry card stock and then onto a Cajun Craze card base. I put some Crushed Curry glitter enamel dots onto the front. I liked this one so much better! Now in addition to stamping with the 'baby-wipe ink', I embossed the leaves as well! These stamps are photopolymer, therefore very easy to see through and place directly on top of your previous stamping. When the leaves had dried from the inking, I re-stamped over them with Versamark and heat embossed using clear embossing powder, this gave a really nice wet look to the leaves, much like you would see after a frost in the autumn. On the second card, I even embossed a second time on the smaller leaves using glitter! I was really happy with how this one turned out.
I have a couple of other cards that I made today, using the same stamp set and accompanying thinlets, to show you, but I will do that tomorrow as it's now getting late in the day. If you would like to purchase any of the items listed just click on the link at the top right corner of this page. If you have any questions, I would be more than happy to answer them, drop me a line, my email is also at the top right side of this post or leave a comment below. Thank you for taking the time to look, I hope you like my cards!
Lately, I have been totally obsessed with the Colorful Seasons stamp set. This set was in the annual catalog that came out on June 1st. I made quite a few cards during the summer with the flowers and now that Autumn is here, I have been using the leaves. I love the colors of fall - the reds, the yellows and different shades of each, I love to sponge and create different combinations for the leaves. My first two cards I tried the 'baby-wipe' technique. Using my re-inkers, I put two drops each of Tranquil Tide, Pumpkin Pie, Crushed Curry, Lemon Lime Twist and Rich Razzleberry on to the baby-wipe. Then you can use this like an ink pad, putting your stamp into various parts to get the different hues to come through. I layered it onto a mat of Lemon Lime Twist, wrapped some 1/4" copper trim around the bottom and glued it to a Tranquil Tide card base. I wasn't really bowled over by this one, I thought it was a little too 'busy', I've never seen leaves with that many hues, but it was a good experience. I went back to the drawing board, so to speak, and this time I used three colors only, Crushed Curry, Cajun Craze and Rich Razzleberry. I stamped the leaves onto a piece of Color Theory DSP in Crushed Curry. It has a marbled effect and it's my favorite in the pack! I matted it onto a piece of Crushed Curry card stock and then onto a Cajun Craze card base. I put some Crushed Curry glitter enamel dots onto the front. I liked this one so much better! Now in addition to stamping with the 'baby-wipe ink', I embossed the leaves as well! These stamps are photopolymer, therefore very easy to see through and place directly on top of your previous stamping. When the leaves had dried from the inking, I re-stamped over them with Versamark and heat embossed using clear embossing powder, this gave a really nice wet look to the leaves, much like you would see after a frost in the autumn. On the second card, I even embossed a second time on the smaller leaves using glitter! I was really happy with how this one turned out.
I have a couple of other cards that I made today, using the same stamp set and accompanying thinlets, to show you, but I will do that tomorrow as it's now getting late in the day. If you would like to purchase any of the items listed just click on the link at the top right corner of this page. If you have any questions, I would be more than happy to answer them, drop me a line, my email is also at the top right side of this post or leave a comment below. Thank you for taking the time to look, I hope you like my cards!
Tuesday, July 4, 2017
Blue Ridge Winery
Hello out there, I hope you all are having a fantastic 4th of July commemorating the adoption of the Declaration of Independence 241 years ago on the 4th July 1776!
On the 17th of June Blue Ridge Winery unearthed their new wine, Underground. It had been buried for 9 months, six feet underground! My friend Peggy and I visit the winery every Tuesday, Peg loooves her tasting! We know Randy, the owner of the Winery as he is always nipping in and out during the week. He is one of the most conscientious people I've ever met, definitely the truest definition of Entrepreneur! Their wines are absolutely fantastic, there isn't one I don't like, though my favorite is Sunshine Red! I wasn't there for the unearthing, Peg was, don't doubt that! I tasted it last week, dry red, and I must say extremely good and I only usually cook with dry, not drink it! Here are two pictures, one is the barrel unearthed and the other you see one of the guys 'rolling out the barrel' as they say!
Anyway, I wanted to congratulate Randy and his family on the 'unearthing' of his new 'red' so what other way would us card makers do that........yep, make him a card! Now when they first 'buried' the wine, they had a painting made and I tried to, kind of, mimic that painting. Here's the picture of part of the painting (don't tell, but I 'borrowed' all these pics from their Facebook page!). Beneath the painting is my card

I sponged a 5 3/4" x 5 3/4" piece of whisper white with the following colors: Blackberry Bliss (retired), Fresh Fig, Cherry Cobbler, Pumpkin Pie and Peekaboo Peach. For the 'water' I sponged with Pacific Point and Soft Sky. The tree was stamped using Blackberry Bliss and the oak tree from the stamp set 'Lovely as a Tree', one of my absolute favorite sets ever! However, none of my existing stamps have a 'bare branch' tree in the same shape so I drew the branches using my Blackberry Bliss stamp-n-write marker! I embossed 'Congratulations' using some retired Cherry Cobbler embossing powder. I then glued this to a Pumpkin Pie mat and then onto a 6 x 6 Whisper White card base. All in all I had an enormous amount of fun creating this card, I've found, over this past year, that I really love sponging, you can get some absolutely stunning effects with inks and sponges! Anyway, I hope you like my card (and I hope Randy and his family do to, I'm giving it to him tomorrow, we couldn't go today as it was the 4th!). If any of you are ever visiting the Poconos in NE PA I urge you to visit the Winery, you won't be disappointed! There is a link above to their Facebook page. If you have any questions about the card (or the Winery LOL!), please don't hesitate to contact me, my email address is at the top right of this post.
On the 17th of June Blue Ridge Winery unearthed their new wine, Underground. It had been buried for 9 months, six feet underground! My friend Peggy and I visit the winery every Tuesday, Peg loooves her tasting! We know Randy, the owner of the Winery as he is always nipping in and out during the week. He is one of the most conscientious people I've ever met, definitely the truest definition of Entrepreneur! Their wines are absolutely fantastic, there isn't one I don't like, though my favorite is Sunshine Red! I wasn't there for the unearthing, Peg was, don't doubt that! I tasted it last week, dry red, and I must say extremely good and I only usually cook with dry, not drink it! Here are two pictures, one is the barrel unearthed and the other you see one of the guys 'rolling out the barrel' as they say!

I sponged a 5 3/4" x 5 3/4" piece of whisper white with the following colors: Blackberry Bliss (retired), Fresh Fig, Cherry Cobbler, Pumpkin Pie and Peekaboo Peach. For the 'water' I sponged with Pacific Point and Soft Sky. The tree was stamped using Blackberry Bliss and the oak tree from the stamp set 'Lovely as a Tree', one of my absolute favorite sets ever! However, none of my existing stamps have a 'bare branch' tree in the same shape so I drew the branches using my Blackberry Bliss stamp-n-write marker! I embossed 'Congratulations' using some retired Cherry Cobbler embossing powder. I then glued this to a Pumpkin Pie mat and then onto a 6 x 6 Whisper White card base. All in all I had an enormous amount of fun creating this card, I've found, over this past year, that I really love sponging, you can get some absolutely stunning effects with inks and sponges! Anyway, I hope you like my card (and I hope Randy and his family do to, I'm giving it to him tomorrow, we couldn't go today as it was the 4th!). If any of you are ever visiting the Poconos in NE PA I urge you to visit the Winery, you won't be disappointed! There is a link above to their Facebook page. If you have any questions about the card (or the Winery LOL!), please don't hesitate to contact me, my email address is at the top right of this post.
Sunday, June 25, 2017
At Home
Whoa, I'm on a roll this week, I've again been playing with one of my new stamp sets, At Home With You. The set has 26 stamps and it comes in a bundle that includes 12 thinlets all for $50.00! I mean, you can't beat that price-wise now can you! It includes stamps for spring, summer, fall and winter, you can't go wrong with this set, there's a little for everyone! There are already a lot of cards on Pinterest using it, some with blue doors, some with red doors, some with wooden doors. I decided I wanted a red door! I chose Early Espresso for my card base which is portrait style, 4 1/4 x 11 scored and burnished at 5 1/2. I married that with a pumpkin pie mat. I embossed a piece of Sahara Sand with the Brick embossing folder and then 'dirtied' it up a bit with a sponge and some Crumb Cake ink. I stamped the door with Early Espresso on to Real Red card-stock and cut it out using the door thinlet. Now the fun thing about the door thinlet is that you can either just cut out the door or you can cut out the frame and have the door open! How fun is that! You may be able to see from this picture but I chose to have the door open! So, when is a door not a door - when it's ajar! Sorry, I couldn't help it, reminds me of when I was a kid and we were always looking for riddles to solve! Anyway, to continue I stamped the two lanterns and the sentiment with VersaMark and embossed them with copper embossing powder. The wreath and two planters were stamped with Early Espresso and then colored with my markers using Old Olive for the Leaves and Melon Mambo and Blushing Bride for the flowers. The Welcome mat was also stamped with Early Espresso. I finished off the wreath and flower pots with some Wink of Stella on the flowers and little linen bows. Oh, and the lantern, wreath, welcome mat and sentiment also have thinlets which I used to cut them all out. Now, after the whole card was put together, I decided I wanted to make the door look kind of freshly painted if you will, so I covered it with Glossy Accents, should really have done this before I put the door on to the mat! The picture, because of the lighting, makes it look wet, but it looks quite good in person ---- I promise (she says!)
Now, as the saying goes - let's see, what's behind the red door!
The sentiment on the front says "Thanks" so inside the door I chose the sentiment "For Everything". I stamped this on a piece of (now retired) Serene Scenery DSP which I also cut out using the door thinlet, that way it fits perfectly behind the door itself. I'm sorry you can't really see this in the picture, but I wanted to show you how the door opens and you can still write your message on the inside of the card as well. Oh, and by the way, there is a thinlet for the little windows on the door, 6 panes! You can't really see them on the front of the card because the wreath partially covers them, but there they are, peeking out just here! Isn't that just the cutest thing!
I really enjoyed making this card, At Home With You is a fantastic set! If you would like to purchase the bundle, the number is 145351. All you have to do is go to my Stampin Up site, there is a link at the top right corner of this page and put the number in under 'Search the Store' and Bob's your Uncle, there it is! Of course, you can buy them separately, but why on earth would you want to! LOL! Thank you for taking the time to look at my post, I hope you like my card!
The sentiment on the front says "Thanks" so inside the door I chose the sentiment "For Everything". I stamped this on a piece of (now retired) Serene Scenery DSP which I also cut out using the door thinlet, that way it fits perfectly behind the door itself. I'm sorry you can't really see this in the picture, but I wanted to show you how the door opens and you can still write your message on the inside of the card as well. Oh, and by the way, there is a thinlet for the little windows on the door, 6 panes! You can't really see them on the front of the card because the wreath partially covers them, but there they are, peeking out just here! Isn't that just the cutest thing!
I really enjoyed making this card, At Home With You is a fantastic set! If you would like to purchase the bundle, the number is 145351. All you have to do is go to my Stampin Up site, there is a link at the top right corner of this page and put the number in under 'Search the Store' and Bob's your Uncle, there it is! Of course, you can buy them separately, but why on earth would you want to! LOL! Thank you for taking the time to look at my post, I hope you like my card!
Friday, June 23, 2017
Graceful Garden
So today I'm just making a card to just make a card as they say! I received my new goodies from Stampin' Up on Monday and today has been the first day I've been able to dedicate a little time to stamping! I've wanted this set since the demonstrators have been able to see the catalog on line. It's called 'Graceful Garden'. It's a 6 piece stamp set, I have placed a picture below. I wanted to do something a little different, I saw one of the Stampin Up bloggers demonstrate a 'basket weave' and I actually managed to complete one on this card! The card base is the new in-color Berry Burst. After I completed the weave, I stamped the actual card base with the 'trellis' stamp, in the same stamp set, using Berry Burst and stamping off once. I used a piece of the Fresh Florals DSP next and then my stamped image on top. For the rose, I stamped it in Memento Tuxedo Black and then, using my stampin' write markers, I colored the rose in Berry Burst and the leaves in Old Olive.To finish off, I used my Wink of Stella on the rose and added three of the new faceted gems which come in 4 different colors and have a beautiful ombre effect. The sentiment seemed just perfect to sit beneath the rose. I think I'm going to make a set in different colors, which would be a perfect gift to give, to maybe, a rose lover!
If you have any questions or would like to order any of the items in this post, please do not hesitate to use the links at the top right of this post. Thank you so much for looking!
Monday, June 19, 2017
Colorful Seasons Birthday Card
Yesterday was Father's Day and also my daughter's birthday! She was born on Father's Day 'x' number of years ago! (Kara would die if I put her actual age here!). So, anyway, it was a double whammy day for my grandchildren and I! We had a wonderful time together as always and this is the card that I made for her. I got the inspiration from a card on Pinterest (don't we all!) made by Jesse Holton, a fellow Stampin' Up demonstrator!
I looove this set, Colorful Seasons, I could play with it all day (and probably will!). For the background, I used shimmery white paper, really excellent for water coloring. The inks I used were Bermuda Bay, which is Kara's favorite, I've probably mentioned that before! I also used Powder Pink which is one of the new in-colors. I used Sahara Sand for the stamen and the flowers were stamped using Powder Pink, stamped tone on tone on the same color paper and cut out using the matching set of die cuts. For the sentiment, also from Colorful Seasons, I used the new in-color Tranquil Tide, which is a bluey greeney (don't think they are actual adjectives!) color - love it! To add to the way Jesse made her card, I finished mine off with a double linen bow glued to a piece of burlap, I thought it just added that kinda 'umph'! I've always tended to shy away from water coloring, it always kinda scared me, but I took my own challenge and I think this came out rather well! Love the card, love the set, can't wait to sit down and use it some more!
Wednesday, May 24, 2017
Wild About Flowers Thank You card
One of my favorite Stampin' Up blogs is JanB Handmade Cards. Jan is a Stampin' Up Demonstrator in the UK. I also frequent Jan's You Tube channel quite a lot too! I get tons of inspiration from her. When I see her cards, I see my style of cardmaking. I can't quite find the word I'm looking for to describe her style except that it is uncluttered and not too busy. The stamps Jan tends to use a lot are those with flowers and today I have made a card that Jan made last week. Yes, I totally C.A.S.E.D her card! I changed the positioning of the sentiments, that's the only 'selective editing' I did! The primary stamp set Jan used is Wild About Flowers, this includes three sets of flowers which are two-step stamping. The base of the card is Very Vanilla and I used the flourish stamp from First Sight for the background on the mat. These are beautiful stamps, there are tons of cards on Pinterest showcasing these sets. So, without further ado, here are three pictures of the card which include the inside and the envelope. If you would like to see Jan's card, please press here
Saturday, May 13, 2017
Jar of Love Mother's Day card
Well, tomorrow is Mother's Day and yesterday I spent some quality time with my daughter's two youngest children, Jaden and Rorey! As 9 and 10 year olds go these days, they are the most fun loving, caring, beautiful children on this planet, states their Grandmother! As such, I was thinking how much I appreciate my daughter for raising my grandchildren to be the way they are. So, because making a card shows how much you care or love someone, I made her a card from me for Mother's Day! Her favorite color is Bermuda Bay, I used that for the card base and the small flowers and hearts. Daffodil Delight was used for the main part of the large flower (it's a two step stamp) and for the center I used Crushed Curry.
I used the 'Jar of Love' stamp set, which, by the way, will continue to be in the 2017-2018 Stampin Up catalog, yipee! It's a beautiful set with 37 stamps in total! Along with the stamps, there are framelits. The set of 'Everyday Jar of Love' framelits contains 17 dies. Enormous value for your dollar I would say! I used both on this card. One of the dies is the small strip of hearts at the bottom of the white mat, first I used the die to cut out the hearts on the white mat, then I repeated the cut on some Bermuda Bay glitter paper (which sadly has retired). I then glued those tiny blue hearts into the spaces left in the white mat! I embossed the rim of the jar using copper embossing powder, a new item in the catalog this year, and then popped it up on the jar using dimensionals. All the stamped images and die cuts are from the Jar of Love sets with the exception of the sentiment. I wanted to hang a label from the jar so I used Teeny Tiny Wishes as that stamp set is just like it states "Teeny Tiny" and this worked really well on the jar. I put dimensionals onto the jar and placed it on half of a white doily. To finish off, I die cut the label with the Stitched Shapes Framelits and tied it to the jar with Bermuda Bay bakers twine. I'm looking forward to tomorrow when I will celebrate Mother's Day with my daughter, her husband and my grandchildren! If you would like a 2017-2018 catalog, please email with your name and address and I will gladly send one out to you. If you have shopped with me in the past 6 months, you will automatically receive one. Similarly, if you would like to purchase any of the items listed here, please do not hesitate to either contact me by email or shop online from my store, both of which are listed at the top right of this blog. I wish all of you out there in blogland a very happy Mother's Day!
Monday, April 10, 2017
Stampin’ Up! The 2017 Retiring List Has Posted!!!
Stampin' Up is getting ready to retire products from both the 2016-2017 Annual and 2017 Occasions catalogs. They don’t want you to miss out! Select retiring products have discounts of up to 50% off.
Be sure to place orders before the sun sets on these items May 31!
- Promotion dates: April 10–May 31, 2017 beginning at 1:00 PM (MT).
- No minimum purchase required.
- Retiring items may be added to all orders.
- Retiring items are eligible for Stampin’ Rewards with qualifying orders.
- All retiring items will be discontinued after May 31.
- All retiring accessories and tools are available while supplies last.
- Due to high demand for retiring stamp sets, Stampin’ Up! will keep producing retiring stamp sets until May 22. After May 22, all retiring stamp sets will be available while supplies last.
- Order Deadlines: May 31, 2017, by 11:55 PM (MT)
You can see the Retiring List right here. There are some great deals on some of Stampin Up's fantastic products so go take a look-see, get a list together and happy shopping! Here’s a quick link to the Retiring Products in my Online Store.
Thursday, March 2, 2017
Mark's 50th birthdayI
I haven't posted in a really really long time! I went to Minnesota in September of 2016 and when I got back it was one thing after the other! First Halloween, then Thanksgiving and then, of course, Christmas! And, like every other year, I got sick! It seems that every year, around the holidays, I come down with something! This year wasn't any different! I ended up in hospital the week of Valentines! Still not sure what's going on with that, so I won't bore you with the details! Onto something pleasant, my eldest son will be turning 50 on March 6th! I keep telling him he's catching up with me! I made this card from black and gold paper (gold shimmer) and used the Number of Years bundle, this includes the stamps and the dies! I love this set and have used it a number (no pun intended!) of times for birthdays and anniversaries. It was quite simple to make, I die cut the 50 from the center of the black mat which was then laid on top of the gold mat. I stamped and die cut the banners for the 'birthday' and 'TH' sentiments and then glued the two mats to the black card base. I then 'dressed' it up a little bit with the gold accents. Didn't want to do too much as it is, after all, a masculine card! I hope you like it, it's simple but very nice I think! If you would like to purchase any of the products I have used please visit my online site, there is a link to it at the top right of this post!
Saturday, September 24, 2016
Reason for the Season triple stamping
A while back I saw a demonstration on triple stamping so I thought I'd give it a go! Of course, I had a Christmas card in mind and I wanted to use the Reason for the Season stamp set that I got towards the end of 2015. It also comes with a Festive Flower Builder punch that you can use to punch out the poinsettia in any color you like. I was concentrating more on that, I made a wreath which I will post a little later, but I must say the punch makes the most beautiful flowers! But today, I finally got the stamp set out, and here is my card
On the smallest (the top) whisper white layer, after creating a mask for the sentiment, I embossed it in Gold. After layering the three white mats (using a little bit of snail on the back of each of the top two pieces to hold them together), I covered the sentiment with the mask and embossed the poinsettias using gold embossing powder. The stamp set is a triple stamp, so I stamped the second part of the flower (the petals) in Cherry Cobbler and the leaves in Garden Green. Now, when you've finished stamping, there are white spaces left within the flower and petals themselves and I didn't particularly like the look. I wanted the flower to be totally 'red'. So I took my Real Red Stampin' Write marker and filled in those white spaces and similarly using my Garden Green marker to fill in the leaves. I also used Crushed Curry to paint the middle of each flower. I was happy with the result, so now it was time to actually 'layer' the layers so to speak! The card base is Real Red and the Whisper White layers are matted with Gold foil. And for the final touch, I used my Wink of Stella pen to brush the flowers and petals! The picture doesn't do it justice, but then pictures rarely do! In person, I think it is a beautiful card! It does take a little while to make, but I think the end result was worth it, plus I really enjoyed 'painting' the flowers!
As always, if you would like to purchase any of the products that I have used here, there is a link to my Stampin' Up online store at the top right of this post. Or, if you would prefer, you can always send me an email, link also at the top right of this post. Thank you for visiting my blog today!
Friday, September 16, 2016
Snow Place like the woods!
Well, I can't seem to stop making Christmas cards! It's such a beautiful season of the year, it makes my heart smile! The inspiration for this card came from a card that Tina Zinck created with the Merry Mice stamp set (one which hasn't reached my mailbox just yet!), it is so cute, take a hop over to her blog The Serene Stamper and take a peek! So anyway, I thought I'd put a snowman in the woods instead! Here's my card
The base of my card is Whisper White with a Pool Party Mat. The top layer began with Whisper White, I took the Woodland embossing folder and sponged Pool Party, Island Indigo and Marina Mist onto it and then stamped the Christmas tree from Lovely as a Tree onto the embossing folder over the blue inks. Once this was done I ran it through the Big Shot. I took a little Crumb Cake ink on a sponge and lightly brushed it over the birch trees to add a small amount of color to them. I then sponged the entire mat with Versamark and sprinkled Iridescent Ice embossing powder (retired from Stampin' Up) on top and heat set it, not sure if the picture is picking that up too well but it's a beautiful sparkly winter effect. I stamped the snowman from the Snow Place set, colored him with stamp 'n write markers and then fussy cut him. I used some burlap ribbon, frayed the edges and placed it along the bottom of the mat with a little vintage wooden snowflake and a snowflake sequin on top. The sentiment is a non-stampin' up image, but it was the one that I thought went best with this card. I really enjoyed making it and loved the way the Christmas trees appear to be behind the birch trees, so many things can be achieved using this embossing folder, images and ink! I hope you like my card, should you need any of the items I have listed, you can order them from my site which is listed at the top right of this post. I would really appreciate your business. Also, if you need a holiday or annual catalog, just drop me an email and I would be glad to send them to you.
Subscribe to:
Posts (Atom)